Have you ever tried to photograph a fast-moving subject only to end up with a blurry photo? This is where your camera’s Shutter Priority mode (S on Nikon, Tv on Canon) comes in. It’s a mode that lets you control your shutter speed while the camera automatically adjusts the other exposure elements (aperture and ISO). By the end of this article, you’ll learn how to adjust the shutter speed yourself, ensuring your camera captures moving images correctly, and you'll also be able to use it to create artistic effects.
When Should You Use Shutter Priority Mode?
- Fast-Moving Subjects: As mentioned in the introduction, fast-moving subjects like kids playing, action sports, and wildlife can end up blurry if you don’t have the proper shutter speed. On full automatic mode, your camera will do its best to produce a nicely exposed image every time, but it doesn’t know if you’re taking pictures of a still flower or a basketball player.
- Creative Motion Blurs: Sometimes you may want to intentionally set a low speed to capture blur in your images, such as silky waterfalls, light trails in the city, or panning shots.
- Prevent Camera Shake: Objects in your scene are moving, but so are you. Unless you are using a tripod, there’s always some movement in the camera itself, no matter how steady you try to hold it. If your shutter speed is too slow, your images might end up blurry or not quite sharp due to camera shake.
How to Set Your Camera to Shutter Priority Mode
- Set Your Camera to S/Tv Mode:
- Turn the mode dial to S (Nikon) or Tv (Canon). Other cameras have similar dials; if it’s different, consult your user manual.
- Choose Your Shutter Speed:
- Fast Shutter Speeds (e.g., 1/1000 sec): Freeze fast action.
- Slow Shutter Speeds (e.g., 1/30 sec): Capture motion blur for creative effects.
- Check the Exposure:
- Ensure your image isn’t too dark or too bright.
- Adjust ISO if necessary to balance exposure.
- Take the Shot:
- Steady your camera, especially at slower shutter speeds.
- Experiment with different speeds to see the effect on your photos.
Common Mistakes and Tips
- Overexposed and Underexposed Images:
- If you get images that are too bright or too dark, it may mean that your shutter speed is too slow or too high. On a bright sunny day, a slow shutter speed to capture silky waterfalls might be tricky and result in overexposure. Similarly, in low-light indoor settings, a fast shutter speed may produce very dark images. In such environments, make a few test shots to ensure you have the correct settings.
- Not Noticing Camera Shake:
- Camera shake may be very subtle, especially on small camera screens. Make sure to zoom in on your images to check if they are blurry. It can be frustrating to take a series of family photos indoors only to find out they are all blurry because of slight camera shake. Use a tripod (or a stable surface) if possible and be mindful of people moving.
General Guidelines
- 1/8000s: Freeze very fast-moving objects.
- 1/4000s: Freeze birds in flight and action sports.
- 1/2000s: Capture running animals and water splashes.
- 1/500s: Street photography; freeze most everyday scenes.
- 1/250s: Photograph people walking.
- 1/125s: General everyday photography.
- 1/60s: Handheld photography with some motion blur.
- 1/30s: Capture flowing water with a slight blur.
- 1s and slower: Night photography, light trails, star trails.
Beware: Any shutter speed under 1/500s may result in blur under certain conditions. Always zoom into practice photos to ensure there is no motion blur.
Conclusion
Using Shutter Priority mode is a great way to gain control over motion in your photos. Experiment with various shutter speeds in different scenarios and observe the effects. Have you used Shutter Priority Mode before? In what scenarios did it come in handy for you? Use your camera's Shutter Priority mode on your next photo outing and share the results on Instagram. Tag me—I’d be happy to see your images!
Until next time, happy shooting!

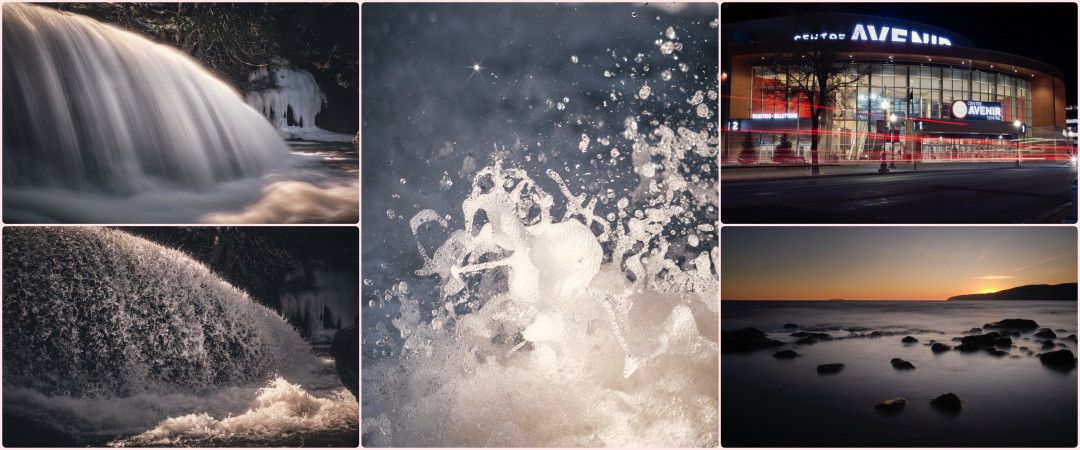
Examples images Shutter Speed:
Article Title Image: 1/50s (Panning - following the subject movement with your camera)
Top-Left: 1/2s (Silky waterfall)
Bottom-Left: 1/640s (Frozen waterfall)
Middle: 1/4800s (Frozen high speed water splashes)
Top-Right: 15s (City light trails from passing cars)
Bottom-Right: 25s (The long exposure creates smooth ocean water)